How to Update BIOS Without a CPU – Easy Guide 2025!
It’s very important to keep your motherboard’s BIOS up to date so that your computer works well. It helps your system work better and support new parts. You may have heard about changing BIOS, but did you realise you can do it without a CPU?
This easy guide will show you how to update your motherboard’s BIOS even without a CPU.
What is a BIOS Update and Why is It Important?
The BIOS (Basic Input/Output System) is the firmware that helps your computer’s hardware communicate with the operating system. If your BIOS isn’t up to date, your computer may experience problems starting up or recognizing components such as RAM and CPU.
BIOS updates fix bugs, improve compatibility with new hardware, and enhance the stability of your system. Updating your BIOS is also crucial for resolving security issues and enhancing your computer’s overall performance.
How to Prepare Before Updating Your Motherboard BIOS:
Before updating the BIOS, it’s essential to prepare. Start by backing up your data. BIOS updates are critical, and there’s a small chance that something might go wrong. If that happens, you can restore your system using a backup.
Next, ensure that you download the correct BIOS version for your motherboard model. If you use the wrong BIOS file, it could damage your motherboard. It’s also a good idea to back up your entire system with a tool like EaseUS Todo Backup. This will create a system image, allowing you to restore your computer if something goes wrong.
How to Flash BIOS Without a CPU:
What Does Flashing BIOS Without CPU Mean?
Flashing BIOS means updating the firmware on your motherboard. With BIOS Flashback, you can update the BIOS without a CPU. This is helpful if you’re building a new computer and haven’t yet acquired the CPU.
Steps for Flashing BIOS Without CPU:
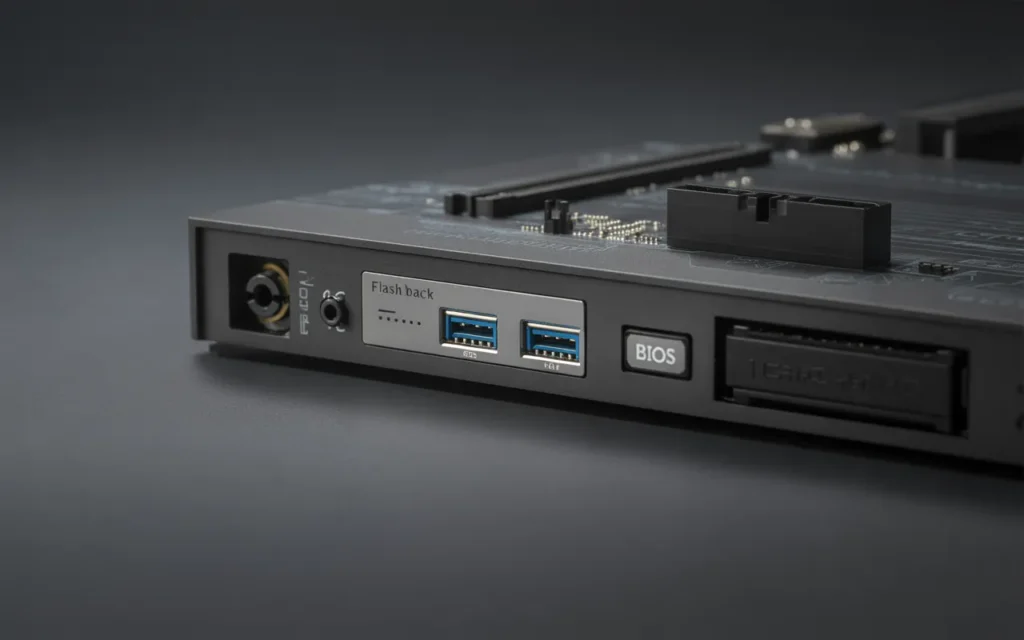
- Look for a Flashback USB port and a small BIOS button on the rear panel of the motherboard.
- You can also confirm support by reading the product specifications or manual on the manufacturer’s website.
2. Download the Correct BIOS File:
- On another computer, visit the official website for your motherboard’s brand.
- Enter your board’s exact model and download the BIOS version compatible with it.
- If there’s a revision number (e.g., Rev 1.0, Rev 2.1), ensure that it is matched correctly.
3. Prepare the USB Drive:
- Plug the USB into your working computer.
- Right-click on it and choose “Format.”
- Select FAT32 as the file system and format the drive.
- This step ensures the motherboard can detect the USB during flashing.
4. Rename the BIOS File (If Required):
- Some manufacturers require the BIOS file to be renamed:
- ASUS: Use the included renaming tool or follow their file naming rules.
- MSI: Rename the file to MSI.ROM.
- Gigabyte: Instructions usually mention a specific name (e.g., GIGABYTE.BIN).
- ASUS: Use the included renaming tool or follow their file naming rules.
- Always refer to your motherboard’s Flashback guide for naming details.
5. Transfer the BIOS File to the USB:
- Copy the BIOS file to the leading directory of the USB (not inside a folder).
- Make sure it’s the only file on the drive.
6. Connect Power to the Motherboard:
- Attach the 24-pin power connector and the 8-pin CPU connector from your PSU to the motherboard.
- Leave the CPU, RAM, and graphics card uninstalled.
7. Plug in the USB and Start Flashing:
- Insert the USB drive into the USB port labelled for BIOS Flashback.
- Press and hold the BIOS Flashback button for 3 to 5 seconds.
- A flashing light near the button should turn on, showing that the update has started.
8. Let It Complete the Update:
- The light will continue to blink while the BIOS is updating.
- Wait patiently it may take up to 10 minutes.
- Once the light stops blinking or turns off, the process is done.
9. Build Your System:
- Now that the BIOS is updated, install your CPU, memory, and graphics card.
- Connect everything as normal and turn on your PC it should now boot without any BIOS compatibility issues.
Why Should You Update Your Motherboard BIOS?
There are several compelling reasons to update your motherboard’s BIOS. Sometimes, the update can help your system work better with new hardware, such as a newer CPU or RAM. A BIOS update can also fix bugs that make your system crash or run slowly.
Updating the BIOS is also important for security reasons. It can fix vulnerabilities that hackers could exploit to attack your system. By updating your BIOS, you ensure your computer remains safe and performs optimally.
Why Updating the Motherboard BIOS Without CPU Is Helpful:
Faster System Setup:
Updating your BIOS without a CPU is especially useful when you’re setting up a new system. Ensure everything is ready for your new CPU or RAM before installation. This way, your system will be prepared to go as soon as you install the new parts.
No Need to Wait for the CPU:
Another reason to flash BIOS without a CPU is convenience. Some motherboards allow you to update the BIOS without the CPU installed. This means you don’t have to wait for the CPU to be installed to update your system and make it ready for new hardware.
Alternative Methods to Update Motherboard BIOS Without CPU:
If your motherboard doesn’t have the BIOS Flashback feature, you can try other methods. Some motherboards offer Q-Flash or EZ-Flash, which allow you to update the BIOS using a USB stick without requiring a CPU.
Another option is to use an external programmer. This tool directly connects to the BIOS chip on your motherboard, allowing you to flash it manually. This feature is useful if your motherboard doesn’t support BIOS Flashback.
Step-by-Step Guide: How to Update BIOS Without a CPU
Simple Process:
Here’s how to update BIOS without a CPU in a few easy steps:
1. Go to your motherboard manufacturer’s website and download the correct BIOS file.
2. Copy the BIOS file to a USB drive and format it to FAT32.
3. Insert the USB into the BIOS Flashback port on your motherboard.
4. Press the Flash BIOS button to start the update.
5. Wait for the update to finish before turning off the system.
Precautions and Potential Risks When Flashing Without CPU:
Although BIOS flashing without a CPU is convenient, it also poses risks. Should an issue arise, your motherboard may sustain damage. To avoid this, make sure you are using the correct BIOS version for your motherboard.
It’s also important to ensure the power supply is stable. If the power goes out during the update, it could damage your motherboard or corrupt the BIOS file. Consider using an uninterruptible power supply (UPS) to protect your system during the update.
Troubleshooting BIOS Update Without CPU:
If the BIOS update doesn’t work, here are some common problems and how to fix them:
- Error codes: Some motherboards display error codes to explain why the update failed.
- Wrong BIOS file: Double-check that you’ve downloaded the correct BIOS version for your motherboard.
- USB Formatting: Ensure the USB drive is formatted to FAT32 and contains the correct BIOS file.
If you’re still experiencing trouble, refer to your motherboard’s manual or contact the manufacturer’s support team for assistance.
Also Read: How to Enable Motherboard HDMI – Complete Guide 2025!
Conclusion:
In conclusion, updating your BIOS without a CPU is simple with the BIOS Flashback feature on modern motherboards. Carefully follow the instructions to guarantee a successful upgrade. Always back up your data and check that you have the correct BIOS version before starting. Updating the BIOS is necessary to preserve your system’s stability and security. It can help your motherboard support new hardware, fix bugs, and improve your computer’s overall performance.
Frequently Asked Questions (FAQ):
1. Can I update the BIOS without using a CPU?
Yes, if your motherboard supports BIOS Flashback, you can update the BIOS without needing to install a CPU or RAM.
2. What is required to update the BIOS without a CPU?
To update BIOS without a CPU, you’ll need a USB drive, the correct BIOS file, and a compatible motherboard.
3. How can I tell if my board supports BIOS Flashback?
To update the BIOS without a CPU, look for a BIOS Flashback button and a labelled USB port on the motherboard.
4. Is it risky to update the BIOS without a processor?
No, updating BIOS without a CPU is safe when done properly using official tools and manufacturer instructions.
5. Can I downgrade the BIOS without a CPU installed?
Some boards allow you to downgrade the BIOS without a CPU, but it’s best to verify support on the manufacturer’s site.
Read More: How to Enter BIOS on ASRock Motherboard – Full Guide 2025!