How to Fix Bent Pins on a Motherboard – Full Guide 2025!
If you have ever had bent pins on a motherboard, you know how annoying it can be. These small pins in the CPU socket are essential because they help connect the motherboard to the CPU. Even a single bent pin can lead to significant issues, such as computer malfunctions or your system failing entirely. The good news is that fixing bent pins on a motherboard is something you can do yourself with the right tools and a little patience.
In this guide, we will walk you through straightening the pins step by step and share some tips to prevent this issue in the future, keeping your computer in good shape.
Understanding the Importance of Fixing Bent Pins on a Motherboard:
Bent pins on a motherboard can create severe problems for your computer. These tiny pins are responsible for establishing connections between your CPU and the motherboard, and even the slightest misalignment can lead to errors or complete system failure. When pins are bent, it can prevent your CPU from properly communicating with the motherboard, causing a range of issues like computer malfunction or even motherboard failure. Repairing bent motherboard pins quickly can save you from costly repairs or having to replace the entire motherboard.
If you don’t address bent pins, you might notice problems such as your computer not booting up, screen flickering, or random system crashes. That’s why it’s so crucial to fix bent pins right away. The sooner you repair the pins, the less chance there is of causing further damage to the motherboard or components.
Causes of Bent Pins on a Motherboard:
Bent pins are often the result of a few common causes. One of the most common causes of pin misalignment is incorrect CPU installation. If the CPU is not appropriately aligned with the motherboard socket, applying pressure to force it into place can bend the pins. Pins can also bend if you don’t handle the motherboard properly while moving, cleaning, or installing it. Even slight knocks or drops can lead to pin damage. In rare cases, manufacturing defects can result in bent pins right from the factory.
Another reason is using improper tools during maintenance, which may accidentally damage the pins. The key to preventing bent pins is careful handling and following CPU installation tips to make sure everything is aligned correctly before inserting the CPU.
Tools Required for Fixing Bent Pins on a Motherboard:
To fix bent pins successfully, you’ll need a few essential tools. Here’s what you’ll need:
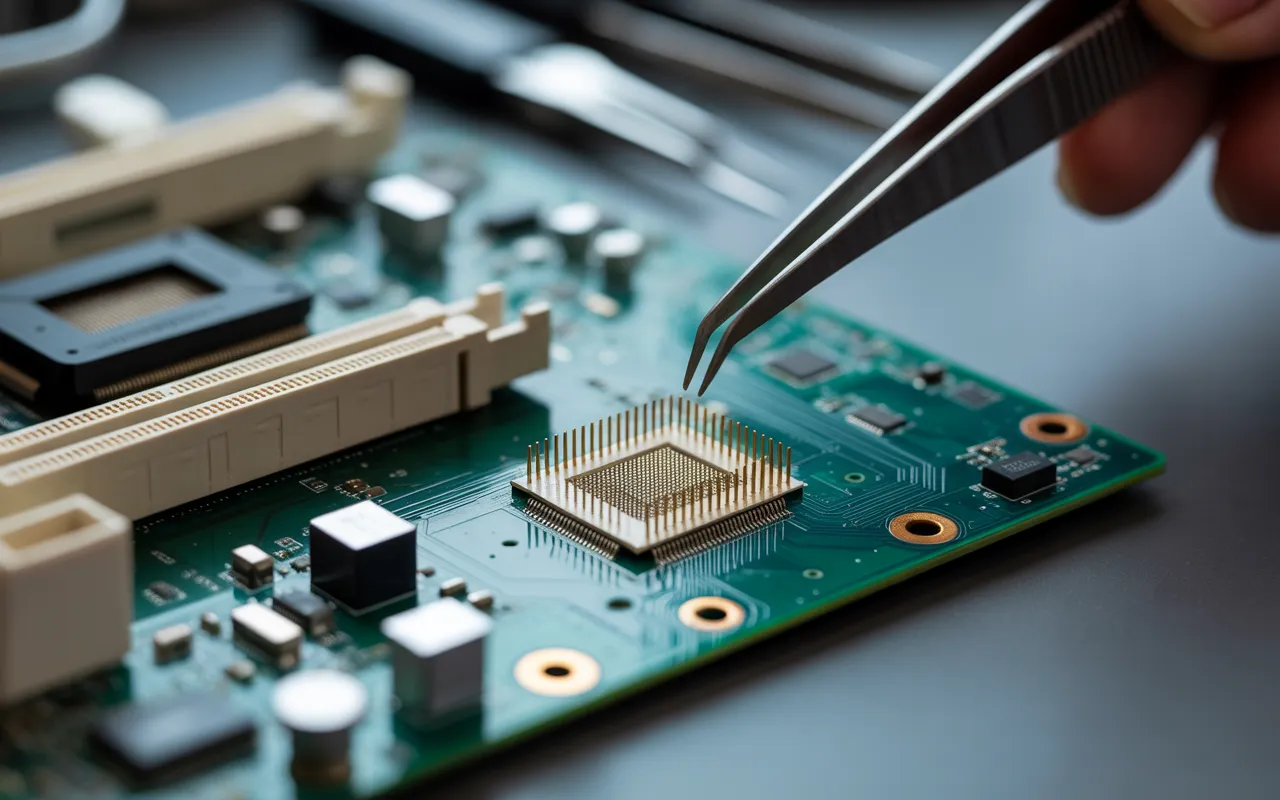
- Precision tweezers: These will help you gently straighten each bent pin without damaging the motherboard.
- Magnifying glass: It allows you to get a closer look at the tiny pins.
- Mechanical pencil for bent pins: This is an unconventional yet effective tool for straightening pins. The hollow tip of the pencil allows you to straighten the pins carefully.
- Antistatic wrist strap: It is essential to prevent static electricity from damaging the motherboard while working on it.
- Isopropyl alcohol and cotton swabs: Useful for cleaning the area before fixing the pins and ensuring there’s no dust or debris.
Having these tools on hand is crucial for performing pin straightening techniques with precision.
Step-by-Step Guide to Fix Bent CPU Pins and Motherboard:
If you’ve identified bent pins on your motherboard, follow these steps carefully:
Step 1: Prepare a Clean and Well-Lit Workspace
Start by setting up a clean and static-free workspace. A clean workspace ensures no debris will interfere with the CPU socket pins or cause further damage. You can use an antistatic mat and wear an antistatic wrist strap to protect the motherboard from static.
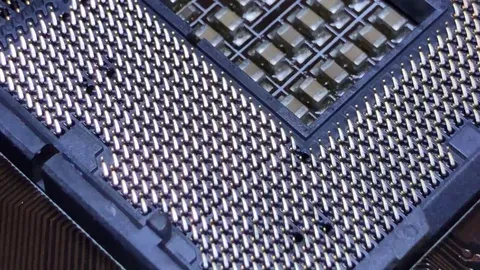
Step 2: Inspect the Pins
Using a magnifying glass, carefully inspect the motherboard pins to identify which ones are bent. If there is any dust or debris, clean the pins gently using isopropyl alcohol and cotton swabs. Make sure you clean the area thoroughly before proceeding to the next step.
Step 3: Straighten the Bent Pins
Now that you’ve identified the bent pins, use your precision tweezers or a mechanical pencil to straighten them. Be very gentle, as applying too much force can cause the pins to snap. Start at the base and slowly push each bent pin back into place.
Step 4: Reinstall the CPU
Once the pins are straightened, reinstall the CPU into the motherboard. Make sure the pin alignment is correct. Press the CPU down gently into its socket and lower the lever to secure it in place.
Step 5: Test the System
After reinstalling the CPU, power up the system to check if the motherboard is functioning correctly. If the system boots up without issues, then the repair was successful. If the system still doesn’t work, the pins might have been too damaged, and you may need to consult a professional for motherboard repair.
Also Read: How to Connect a PWM Cable to Your Motherboard – Guide 2025!
Other Methods to Fix Bent Pins on a Motherboard:
Sometimes, manually straightening pins isn’t enough, or the pins are too difficult to access. Here are two alternatives you can try:
Using a Mechanical Pencil for Bent Pins:
A mechanical pencil can be a great tool to fix bent pins. Remove the lead, leaving the hollow body. Insert the bent pin into the pencil’s tube and gently roll it to straighten it. This method is beneficial for pins that are difficult to reach with tweezers.
Seeking Professional Assistance:
It’s best to get professional help if you’re unsure how to fix bent pins or if the damage is too extensive. Professional motherboard repair services have the experience and tools to fix bent pins without causing further damage. Although it may be more costly, it ensures that the motherboard is repaired correctly.
Preventing Bent Pins on a Motherboard:
While you can fix bent pins, preventing them from happening in the first place is always better. Here are some tips to avoid bent pins:
Handling the Motherboard with Care:
When handling the motherboard, always be gentle. Avoid pressing on the pins or placing unnecessary pressure on the motherboard socket.
Ensuring Proper Alignment During Installation:
Before inserting the CPU, make sure it’s aligned properly with the motherboard socket. If the CPU is not aligned correctly, forcing it into the socket can lead to pin misalignment.
Avoiding Excessive Force:
Never force components into place. If something feels stuck or misaligned, double-check its position before applying force. Installation errors are often the cause of bent pins.
Using Antistatic Precautions:
Always use an antistatic wrist strap when working on your computer. Static electricity can cause irreparable damage to your motherboard and its components. Make sure to ground yourself regularly during the process.
Conclusion:
Fixing bent pins on a motherboard doesn’t have to be a complicated or expensive task. By following the proper steps, using the right tools, and handling your components with care, you can restore your motherboard to full functionality. Remember, prevention is always better than repair. By following CPU installation tips and using static electricity precautions, you can reduce the risk of bent pins and keep your computer running smoothly.
Frequently Asked Questions:
1. What causes bent pins on a motherboard?
Bent pins are often caused by improper CPU installation, mishandling, or accidental force applied during installation. They can also occur during maintenance or cleaning if the motherboard is dropped.
2. Can bent pins on a motherboard be fixed?
Yes, bent pins can often be repaired by gently straightening them using tools like precision tweezers or a mechanical pencil.
3. How do I fix bent pins on a motherboard?
To fix bent pins, carefully inspect the pins, use precision tweezers to straighten them, and ensure the alignment is correct. Afterward, reinstall the CPU and test the system.
4. Are there any precautions I should take while fixing bent pins?
When repairing bent pins, always work in a clean and static-free workspace. Be gentle while straightening the pins, and use the correct tools to avoid causing further damage.
5. Can I prevent bent pins on a motherboard?
To prevent bent pins, handle your motherboard carefully, ensure the CPU is aligned correctly during installation, and avoid using excessive force. Always take static electricity precautions to protect your components.
Read More: How to Enter BIOS on ASRock Motherboard – Full Guide 2025!